SEDU Board vorbereiten
http://www.sedu-board.de/sedu-ambilight/howto-seduboard-einstellen/
Installation von Boblight
Die Software boblight besteht aus mehreren Prozessen die separat angestartet werden müssten.
„boblightd“ ist für die Kommunikation verantwortlich, während „boblight-X11“ den Bildschirminhalt analysiert, auswertet, und an boblightd weitergibt.
Ausführliche Informationen zu Boblight findet ihr auf der ProjektSeite:
http://code.google.com/p/boblight/ und http://blogger.xs4all.nl/loosen/category/32622.aspx
Installation mit Skript
sudo su
wget https://dl.dropbox.com/u/21136636/scripts/boblight_setup
chmod 777 boblight_setup
./boblight_setup
Manuelle Installation
Sourcen auschecken
sudo su
apt-get install subversion
cd /usr/src
svn checkout http://boblight.googlecode.com/svn/trunk/ boblight-read-only
Abhängigkeiten installieren
sudo apt-get install libx11-dev libgl1-mesa-dev libxrender-dev libxext-dev portaudio19-dev libavcodec-dev libavformat-dev libswscale-dev libavdevice-dev
Boblight bauen & installieren
cd boblight-read-only
./configure
make
make install
ldconfig
Konfiguration
boblight.conf
Das boblight.conf File ist die wichtigste Konfigurationsdatei. Neben den Parametern zur Kommunikation mit dem SEDU-Board, enthält sie auch alle Daten zu den Bildschirmbereichen die den jeweiligen Kanälen des Ambilights zugeordnet werden sollen. Die Einteilung des Bildschirm kann bei der Fülle an Kanälen sehr aufwendig sein. Das folgende kleine Programm hilft dabei, eine entsprechende Konfigurationsdatei zu erstellen:
BoblightConfigTool
Beispiel:
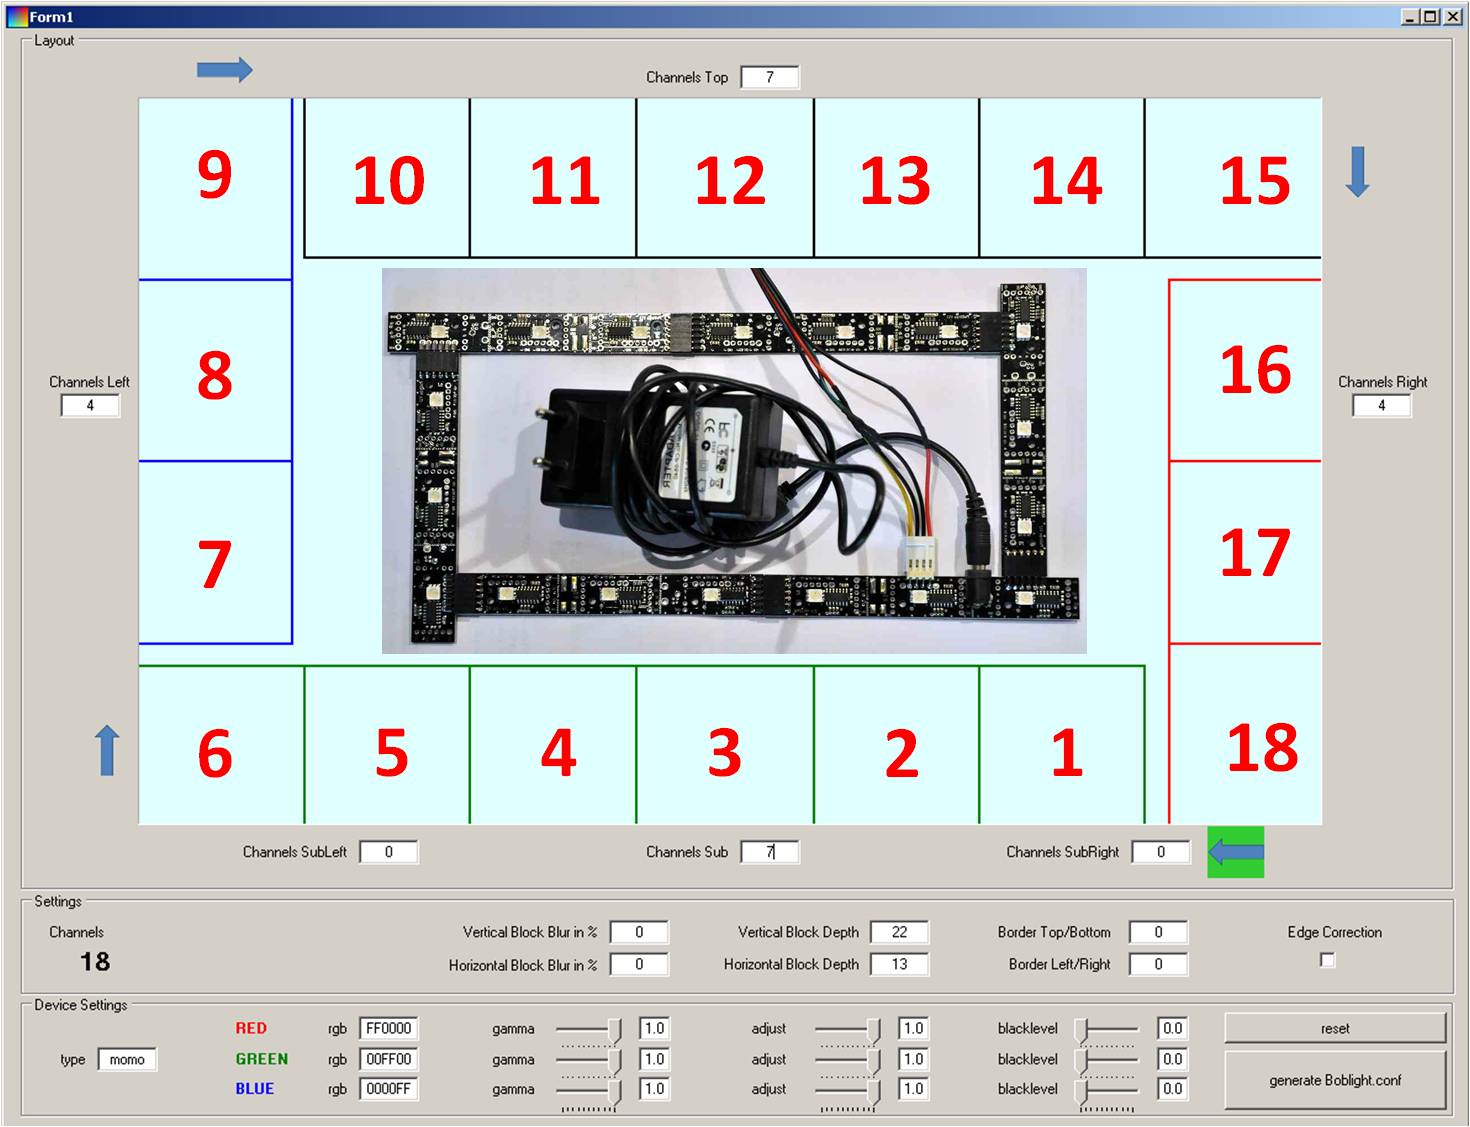
Neben den Blöcken können auch Paramater wie Überlappung der Blöcke/ Tiefe der Blöcke etc. mitgegeben werden.
In unserem Beispiel:
#[global]
interface	127.0.0.1
port		19333

[device]
name		ambilight
output		/dev/ttyUSB0
channels	768
type		momo
interval	10000
prefix 		5A B0
postfix 	A5
rate		500000

[color]
name		red
rgb		FF0000
gamma		1
adjust		1
blacklevel	0

[color]
name		green
rgb		00FF00
gamma		1
adjust		1
blacklevel	0

[color]
name		blue
rgb		0000FF
gamma		1
adjust		1
blacklevel	0

[light]
name		Left1
color		red 	ambilight 1
color		green 	ambilight 2
color		blue 	ambilight 3
hscan		0 13
vscan		50 75

[light]
name		Left2
color		red 	ambilight 4
color		green 	ambilight 5
color		blue 	ambilight 6
hscan		0 13
vscan		25 50

[light]
name		Left3
color		red 	ambilight 7
color		green 	ambilight 8
color		blue 	ambilight 9
hscan		0 13
vscan		0 25

[light]
name		Top1
color		red 	ambilight 10
color		green 	ambilight 11
color		blue 	ambilight 12
hscan		14 28
vscan		0 22

[light]
name		Top2
color		red 	ambilight 13
color		green 	ambilight 14
color		blue 	ambilight 15
hscan		28 42
vscan		0 22

[light]
name		Top3
color		red 	ambilight 16
color		green 	ambilight 17
color		blue 	ambilight 18
hscan		42 57
vscan		0 22

[light]
name		Top4
color		red 	ambilight 19
color		green 	ambilight 20
color		blue 	ambilight 21
hscan		57 71
vscan		0 22

[light]
name		Top5
color		red 	ambilight 22
color		green 	ambilight 23
color		blue 	ambilight 24
hscan		71 85
vscan		0 22

[light]
name		Top6
color		red 	ambilight 25
color		green 	ambilight 26
color		blue 	ambilight 27
hscan		85 100
vscan		0 22

[light]
name		Right1
color		red 	ambilight 28
color		green 	ambilight 29
color		blue 	ambilight 30
hscan		87 100
vscan		25 50

[light]
name		Right2
color		red 	ambilight 31
color		green 	ambilight 32
color		blue 	ambilight 33
hscan		87 100
vscan		50 75

[light]
name		Right3
color		red 	ambilight 34
color		green 	ambilight 35
color		blue 	ambilight 36
hscan		87 100
vscan		75 100

[light]
name		Sub1
color		red 	ambilight 37
color		green 	ambilight 38
color		blue 	ambilight 39
hscan		71 85
vscan		78 100

[light]
name		Sub2
color		red 	ambilight 40
color		green 	ambilight 41
color		blue 	ambilight 42
hscan		57 71
vscan		78 100

[light]
name		Sub3
color		red 	ambilight 43
color		green 	ambilight 44
color		blue 	ambilight 45
hscan		42 57
vscan		78 100

[light]
name		Sub4
color		red 	ambilight 46
color		green 	ambilight 47
color		blue 	ambilight 48
hscan		28 42
vscan		78 100

[light]
name		Sub5
color		red 	ambilight 49
color		green 	ambilight 50
color		blue 	ambilight 51
hscan		14 28
vscan		78 100

[light]
name		Sub6
color		red 	ambilight 52
color		green 	ambilight 53
color		blue 	ambilight 54
hscan		0 14
vscan		78 100
Diese Datei muss nun unter /etc abgelegt werden.
Hierzu öffne ich die Datei auf meinem Windows System mit Notepad++ und kopiere den gesamten Inhalt.
Dann gehe ich in putty und mache ein:
sudo nano /etc/boblight.conf
Mit Rechtsklick füge ich den gesamten Inhalt der Zwischenablage ein. Gespeichert wird mit
STRG+X dann J für „Ja speichern“.
Betrieb
Test unter Linux
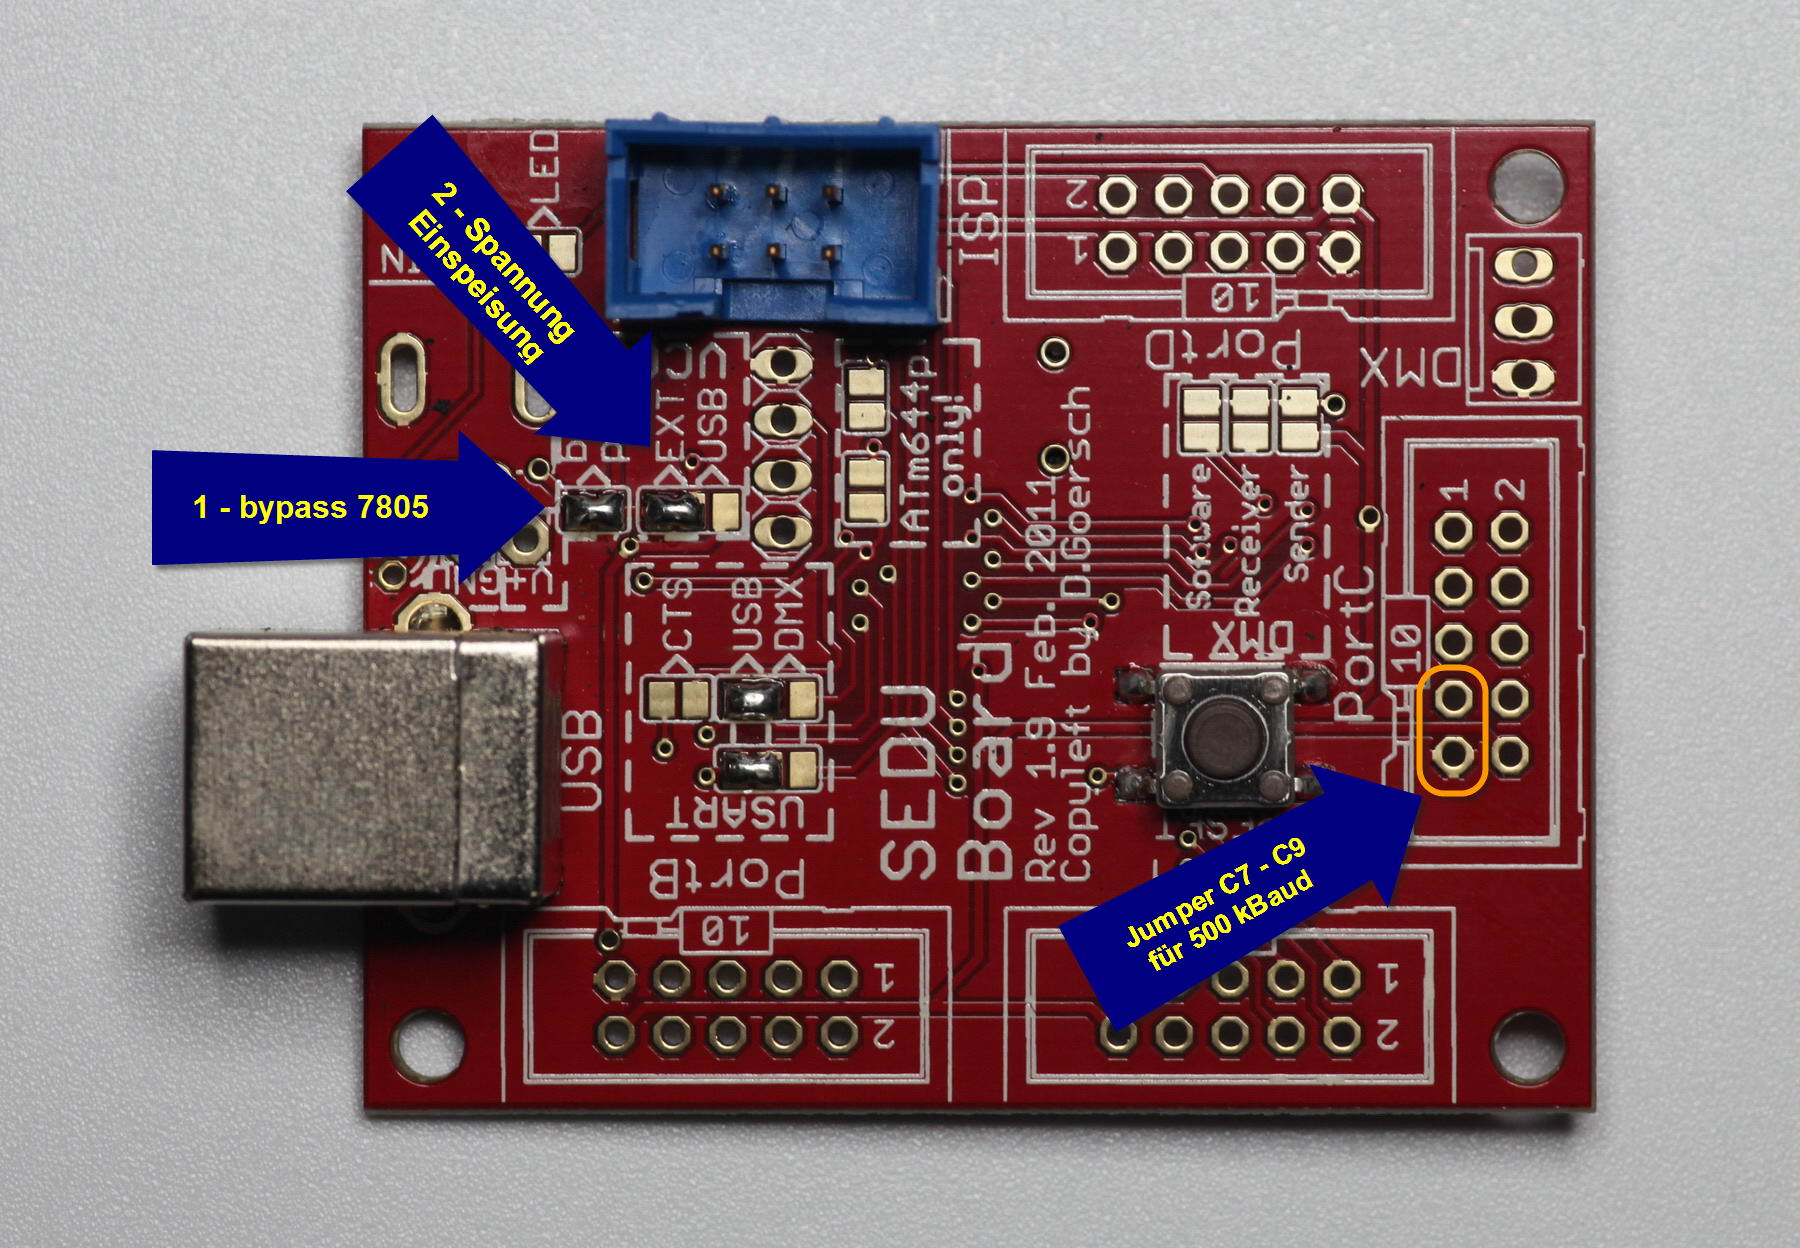
Da Linux nur den Einsatz von 500k Baudrate unterstützt, deshalb ist es nötig das SEDU Board mittels Jumper vom 250k Baudrate zum 500k Baudrate Betrieb zu bewegen.
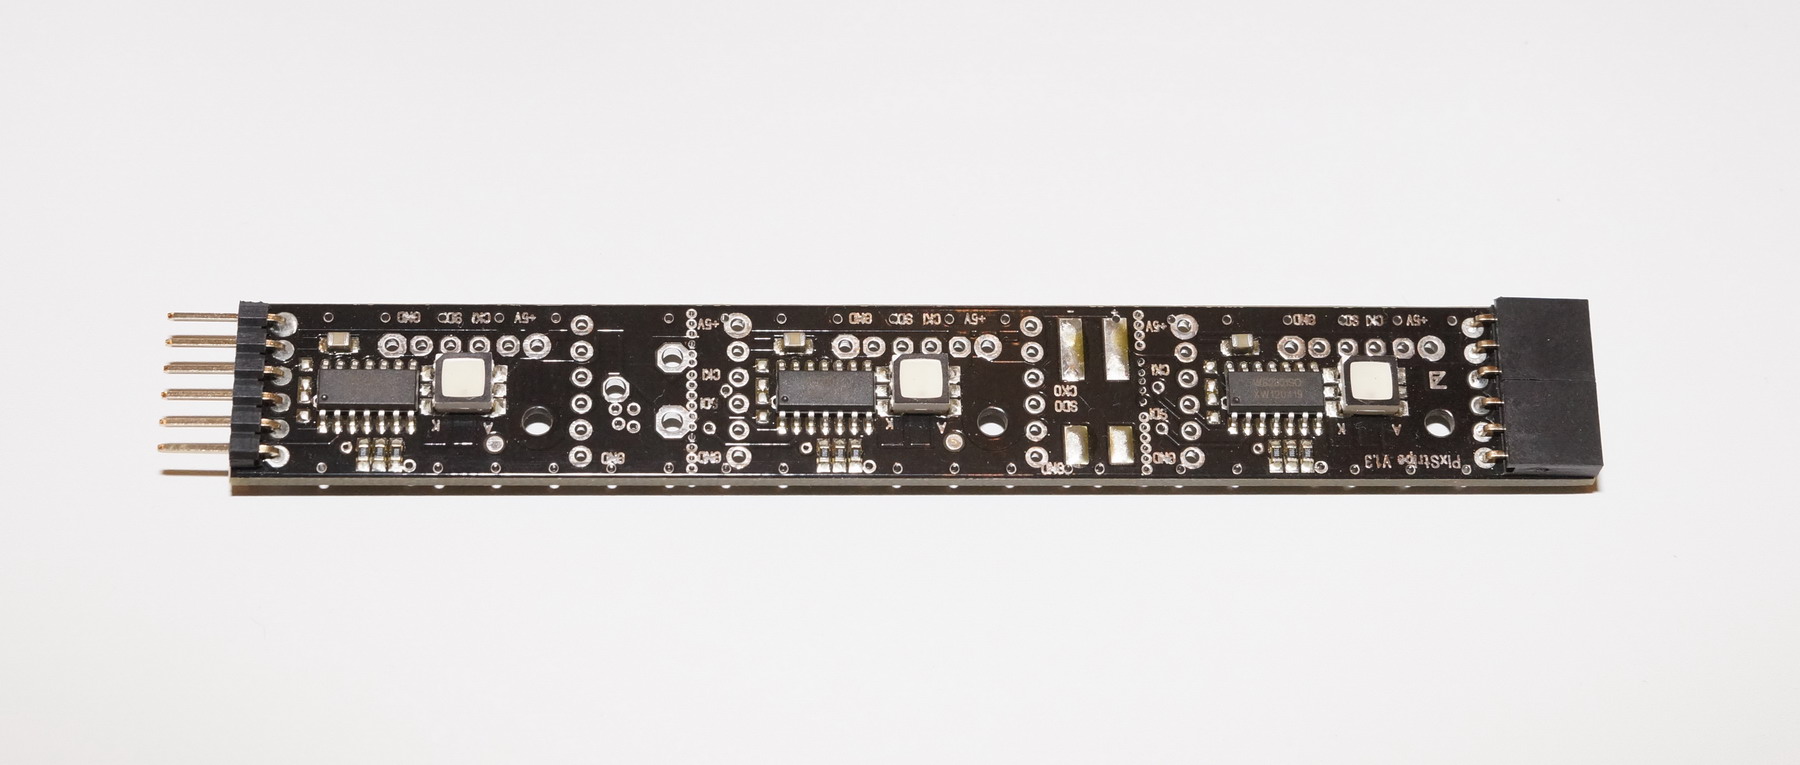
Wir verbinden die Spannungsplatine mit dem Netzteil und anschließend das SEDU-Board mit der Platine. Nun sollte unser soeben gespeichertes Standardprogramm ablaufen.
Zuletzt verbinden wir USB mit dem Linux HTPC.
Ambilight testen
Wir schauen nach ob das SEDU Board erkannt wurde:
ls /dev/tty*
der Eintrag „/dev/ttyUSB0“ sollte erscheinen.
Nun öffnen wir zwei Putty Terminal und melden an Sudo wäre von Vorteil:
In das eine tippen / kopieren wir:
boblightd
wir warten einige Sekunden und tippen in das Andere:
boblight-constant FFFFFF
Sofern es nun „weiß“ leuchtet haben wir alles richtig gemacht und sind so gut wie fertig.
Nun beenden wir boblight-constant mit STRG+C
Wir starten nun boblight-X11
boblight-X11 -o speed=40 -o valuemin=0.004 -o value=1.5 -o saturation=1.1 -o threshold=10
Nun sollte das Ambilight korrekt laufen und muss nur noch im Autostart hinterlegt werden.
Autostart
Autostart Skript einrichten
Ich für meinen Teile lege im HomeOrdner ein Skript an, welches boblight startet. So kann ich es auch unab. von einem Neustart testen.
nano autostart
folgende Zeilen einfügen:
#!/bin/sh
cd $HOME
mkdir autostart_funktioniert
chmod 777 /dev/ttyUSB0
sleep 10
su - xbmc -c "boblightd -f"
#/usr/bin/oscam -c /etc/oscam &
su - xbmc -c "DISPLAY=:0.0 boblight-X11 -o speed=40 -o valuemin=0.004 -o value=1.5 -o saturation=1.1 -o threshold=10"
STRG+X und J zum speichern.
jetzt machen wir die Datei noch ausführbar:
sudo chmod 777 autostart
Diese Datei muss nun beim Booten aufgerufen werden, wir tragen den Aufruf in die rc.local Datei ein.
sudo nano /etc/rc.local
wir fügen unten eine Zeile ein. Das Ergebnis dürfte so aussehen:
#!/bin/sh -e
#
# rc.local
#
# This script is executed at the end of each multiuser runlevel.
# Make sure that the script will "exit 0" on success or any other
# value on error.
#
# In order to enable or disable this script just change the execution
# bits.
#
# By default this script does nothing.
$HOME/autostart
exit 0
neustarten und mit
ps -ae
schauen ob boblightd und boblight-X11 laufen.


Da Linux nur den Einsatz von 500k Baudrate unterstützt, deshalb ist es nötig das SEDU Board mittels Jumper vom 250k Baudrate zum 500k Baudrate Betrieb zu bewegen.
Welchen Jumper muss ich denn setzen? Das Bild fehlt leider noch… Meine Hardware-Version ist die 1.9 – mit der Firmware 1.5 (Serial 0009)?
Ich fix das eben bzw füge Bilder ein 😉
Port C . Eventuell wäre es aber auch Sinnvoll auf die neuste FW fürs 1.9er Sedu upzudaten (Edit turi: Firmware wird auf Anfrage per Mail verschickt)
In dieser Version ist sicher der Jumper noch nicht vorbereitet. Den kann man aber auch leicht durch eine Brücke einlöten. Das Bild für die Position vom Jumper ist oben zu sehen (Port C7-C9).
Ist die Anleitung betr. der Konfigdatei von boblight noch aktuell / korrekt? Bzw. wirft das Tool noch eine funktionierende Konfigdatei aus? Ich habe auf der Boblight – Wiki Seite zur boblight.conf das hier gesehen:
http://code.google.com/p/boblight/wiki/boblightconf
…
type
Specifies the type of the device, this setting is mandatory.
Possible values are ltbl, momo, atmo, sound, popen, dioder, karate, ibelight and sedu.
…
Da ist von einem Typ „sedu“ die rede… soll / kann / darf dieser in der boblight.conf vergeben werden?
…
prefix
Specifies a prefix in hex sent before each burst of rgb information, this setting is optional and only applies to momo devices.
postfix
Specifies a postfix in hex sent after each burst of rgb information, this setting is optional and only applies to momo devices.
…
Sind diese dann noch nötig, wenn der Typ auf „sedu“ steht?
Und wenn ja, ist der Prefix noch korrekt mit „5A B0“? In der SEDU-Ambilight Doku steht: „A5 5A FF“?
Oder bin ich jetzt verwirrt? 😉